YOLOv7은 타이완 중앙연구원 정보과학연구소(Institute of Information Science, Academia Sinica, Taiwan)의 치엔-야오 왕(Chien-Yao Wang)이 논문의 1저자이다. YOLOv7의 공식 github를 보면 Pose estimatin(자세추정), Instance segementatione 등의 기술도 지원한다. 나중에 공부할 기회가 생기면 해보고 싶은 분야이다. 앞서 말했듯이 작동환경은 이전글을 참고 바란다.
일단 아나나콘다 환경에서 아래의 명령어를 입력해 yolov7 가상환경을 생성하고 가상환경을 실행한다.
$ conda create -n yolov7 pyton=3.8
$ conda activate yolov7
URL : https://github.com/WongKinYiu/yolov7을 입력해 git clone을 진행한다. 디렉토리는 사용자가 편한곳으로 설정한다.
YOLOv5의 공식문서에서 Python에 관한 내용은 안보여서 3.7이상이면 구동이 되는것 같다. PyTorch>=1.7.0(!=1.12.0) 환경에서 실행이 되므로 다음과 같이 따로 설치해준다. 권장 버전과 달라도 가능하지만 나머지 패키지의 버전을 유의해서 설치해야한다.
$ conda install pytorch==1.12.1 torchvision==0.13.1 torchaudio==0.12.1 cudatoolkit=10.2 -c pytorch아래의 사진과 같이 requirements.txt 에 필요한 패키기 리스트가 나와있다.
아래의 명령어를 입력해 한번에 설치가 가능하다. 필요한 패키지는 다 설치 해주도록 한다.
지금 까지 pip로 설치한건 아니고 본인은 conda isntall을 사용해 하나씩 설치했다. dependency 문제인데 이부분도 추후에
기회가 되면 포스팅 하도록 하겠다.
$ pip install -r requirement.txt
필요한 패키기 설치가 끝났으면 custom dataset을 정리해주어야 한다.
custom dataset은 YOLO_mark(다른 annotation tool)을 사용해 학습할 이미지, txt파일(YOLO_format)을 준비한다.
dataset은 아래의 사진과 같이 준비를 해야한다. YOLOv5와 파일구성이 같다.
imgaes에는 .jpg파일이 / labels파일에는 .txt파일이 들어가야한다. 이때 .jpg파일과 .txt파일 이 일치해야한다.

다음은 custom.yaml파일을 만들어 준다. 모델의 구성파일이다.
아래의 사진과 같이 구성을 해주면 된다. 대부분의 YOLO 가 이런 형식의 yaml 파일을 사용하는것 같다.
아래의 custom.yaml은 coco.yaml을 참고해서 수정했다.

path : train, validation, (test) 이미지와 annotation이 있는 폴더의 경로
train : train 이미지의 경로 / val : validation 이미지의 경로
nc : class의 갯수
names : class의 이름
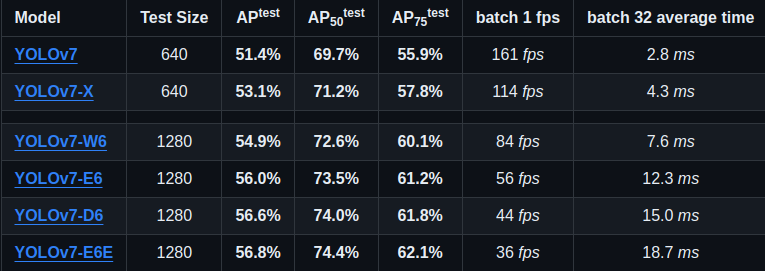
pretrain 모델을 이용하면 좀 더 빠르고 정확한 학습을 진행할 수 있다. pretrained된 모델을 선택한다.
YOLOv7-x 를 골라서 사용했다. 나머지 모델은 test size가 너무 커서 구동이 안될것 같아 선택을 안했다.
본인의 컴퓨터 사양에 맞는 모델을 다운받도록 하자
이제 학습을 시작할 차례이다. 사전에 wandb와 같은 딥러닝 실험 과정을 손쉽게 Tracking하고, 시각화할 수 있는 Tool을 사용하면 더 쉽게 추적을 할수 있다.
학습을 시작하기 전에 중요한 Train 인자들을 살펴보도록 하겠다.
| Parameter | Value | Description |
| --weights | yolov7.pt | 모델의 초기 가중치의 경로 |
| --cfg | ' ' | model.yaml의 경로 (--weight 나 --cfg는 둘중 하나는 반드시 입력해야함) |
| --data | data/coco.yaml | data.yaml의 경로 |
| --epochs | 300 | 학습 횟수 |
| --batch-size | 16 | batchs-size |
| --img-size | [640, 640] | 이미지 크기 |
| --device | ' ' | GPU의 갯수 1개이면 0 / 여러개이면 0,1,2,3 등 / CPU도 가능하다 |
| --multi-scale | ' ' | img-size +/- 50% 변경 |
| --adam | torch.optim.Adam() optimizer 사용 | |
| --workers | 8 | 최대 dataloader의 갯수 |
이제 학습을 시작할 차례이다. 아래의 명령어를 입력하면 훈련이 시작된다.
yaml, weights 파일의 위치만 주의해서 적어주면 된다.
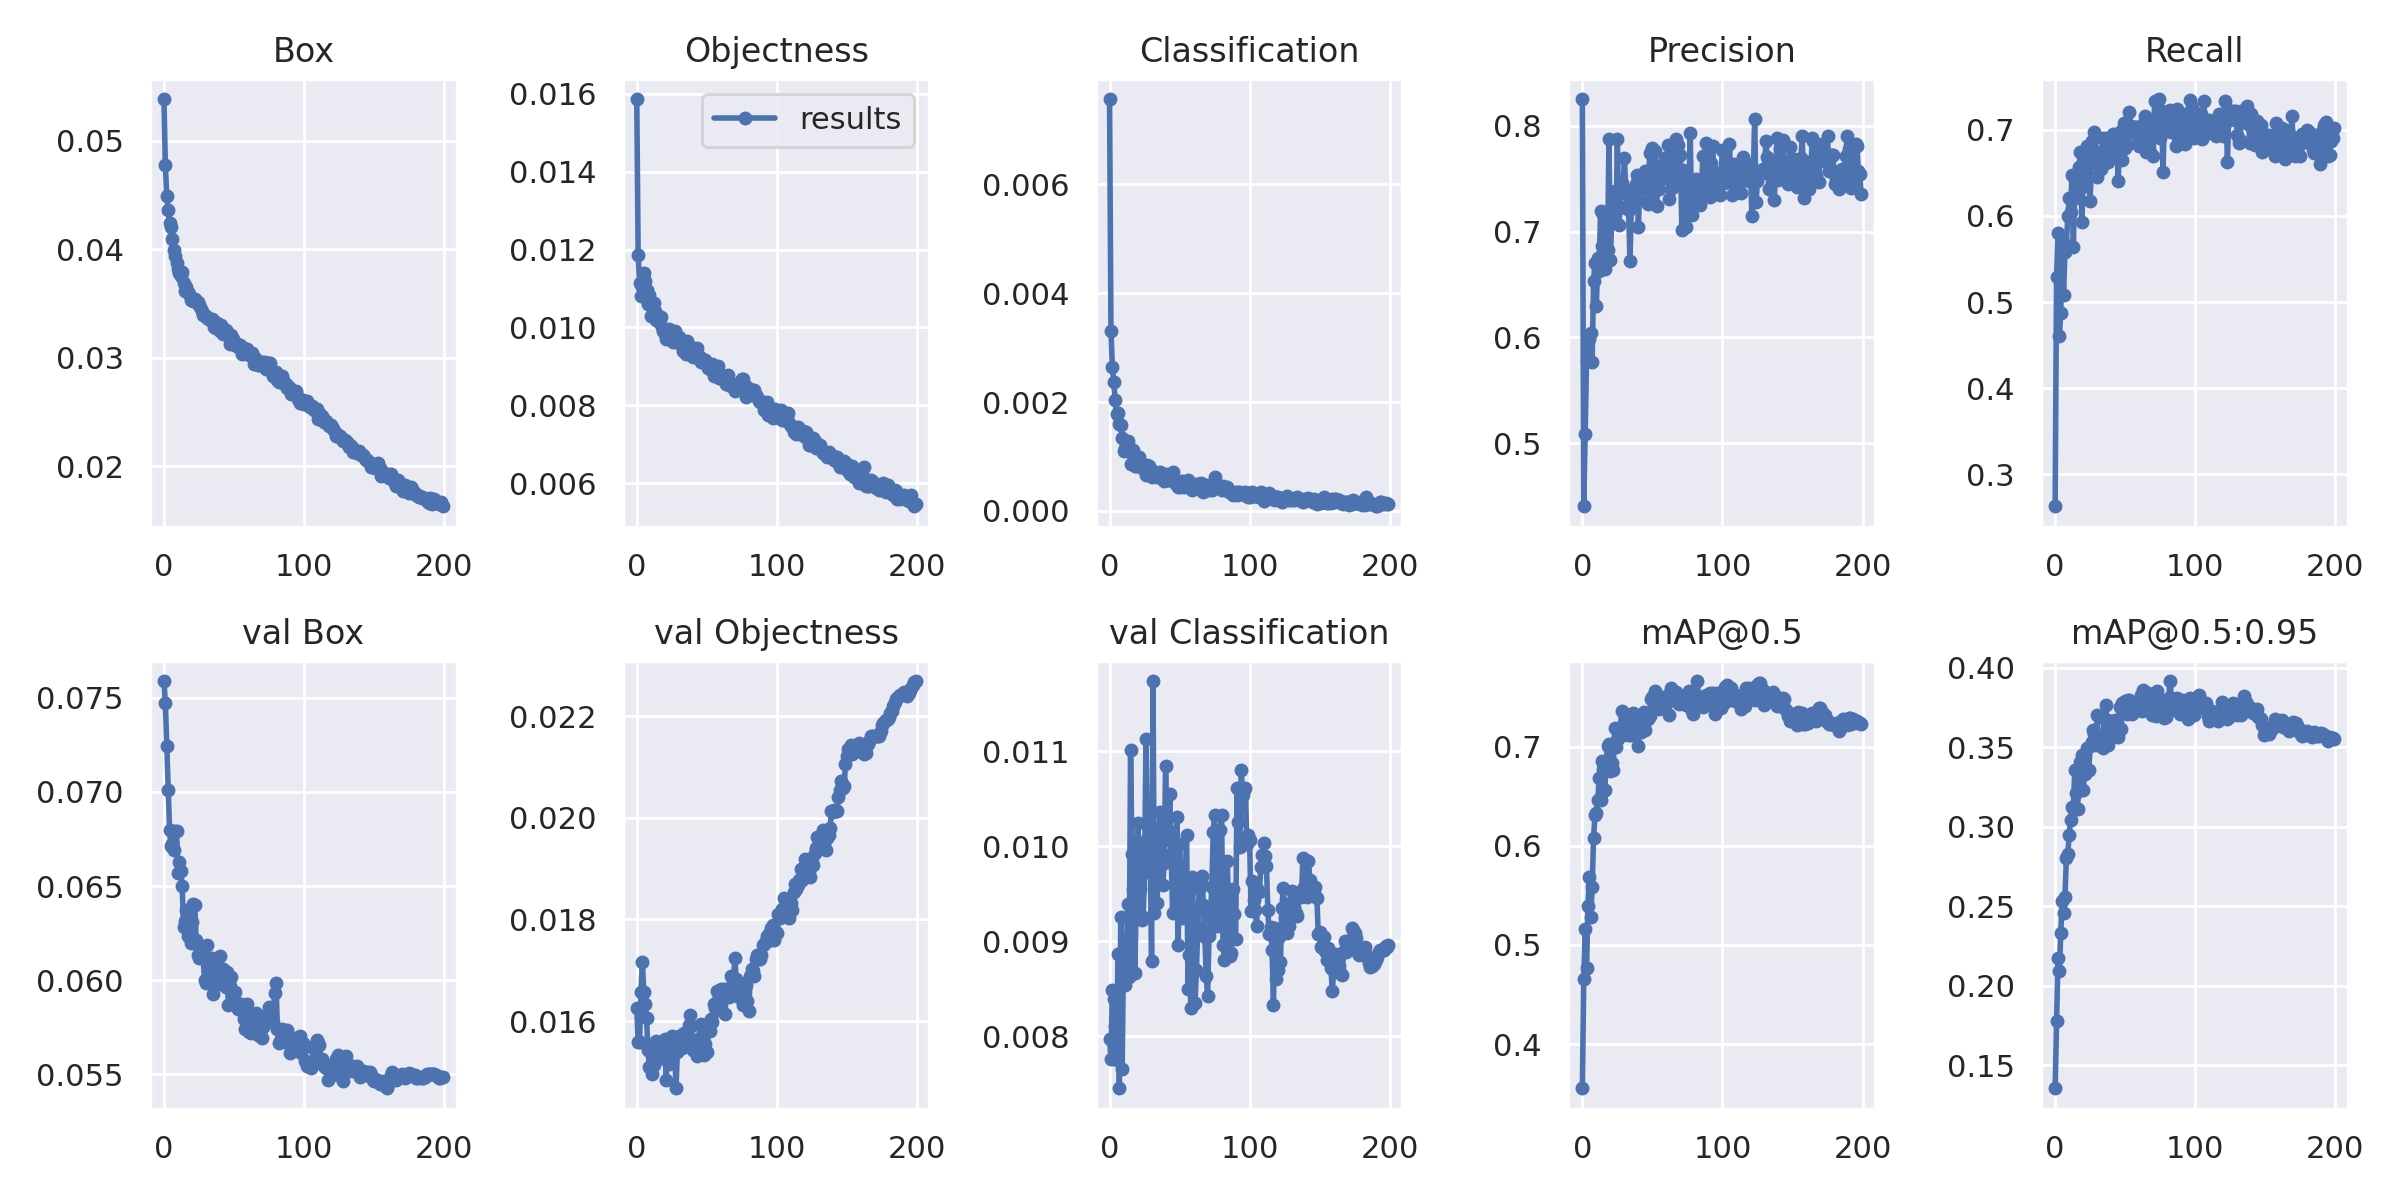
$ train.py --device 0 --batch-size 4 --epochs 200 --img 640 640 --data data/custom.yaml --hyp data/hyp.scratch.custom.yaml --cfg cfg/training/yolov7x_custom.yaml --weights yolov7x.pt --name yolov7x-customwandb와 연동이 되어 있다면 학습 진행중 결과를 실시간으로 확인을 할수 있다.
학습이 끝나면 다음과 같이 결과파일도 확인 할 수 있다.

아래의 명령어를 입력해 detection을 진행 할수 있다.
$ python detect.py --weights runs/train/yolov7x-custom/weights/best.pt --conf 0.8 --img-size 640 --source 0
Reference
https://github.com/WongKinYiu/yolov7
GitHub - WongKinYiu/yolov7: Implementation of paper - YOLOv7: Trainable bag-of-freebies sets new state-of-the-art for real-time
Implementation of paper - YOLOv7: Trainable bag-of-freebies sets new state-of-the-art for real-time object detectors - GitHub - WongKinYiu/yolov7: Implementation of paper - YOLOv7: Trainable bag-of...
github.com
https://blog.naver.com/ai-engineering/223204278819
YOLOv7 Custom training / 커스텀 학습시키기
https://blog.naver.com/ai-engineering/222923362592 Windows 환경에서 YOLOv7을 구동하기 위한 환경...
blog.naver.com
https://tae-jun.tistory.com/11
[YOLOv7] custom training
colab 환경 0. 설치 import sys import torch print(f"Python version: {sys.version}, {sys.version_info} ") print(f"Pytorch version: {torch.__version__} ") !nvidia-smi !# Download YOLOv7 code !git clone %cd yolov7 !ls !pip install -r requirements.txt 1.
tae-jun.tistory.com
https://blog.roboflow.com/yolov7-custom-dataset-training-tutorial/
How to Train YOLOv7 on a Custom Dataset
Follow this tutorial to learn how you can train a Yolov7 model with custom data for you next computer vision project.
blog.roboflow.com
정확한 정보 전달보단 공부 겸 기록에 초점을 둔 글입니다. 틀린 내용이 있을 수 있습니다.
틀린 내용이나 다른 문제가 있으면 댓글 남겨주시거나 또는 이메일로 보내주시면
감사하겠습니다.
'Object Detection > YOLO' 카테고리의 다른 글
| YOLOv6 custom Train (0) | 2024.01.29 |
|---|---|
| YOLOv5 custom Train (0) | 2024.01.28 |
| YOLOv4 custom Train (1) | 2024.01.27 |
| YOLOv3 custom Train (0) | 2024.01.25 |
| [Ubuntu 20.04 LTS] Darknet 설치 (0) | 2024.01.24 |